Pages

Monday, February 5, 2018

Ideas for a DonorsChoose Project


Hello, again! I hope you are starting to be more comfortable with the idea of starting a DonorsChoose project. Click here to see other posts One of my most popular questions that I receive via Twitter is what type of projects have I had funded. So I thought I would just share a few here and that may get your creative juices flowing as you are planning a DonorsChoose project! I have had almost 50 projects funded. Most of my projects have been written specifically for my classroom but I have also written projects that have benefited my entire grade level and even a project for my entire school! So sit back, grab your caffeine and scroll through these pictures and let the ideas flow!


This is one of my larger projects, a $2,619 3D printer! This has been an item that every class since has been able to enjoy and learn with this printer. We have built math manipulatives, our names, thematic items to go with content that we are studying, gifts, ornaments, table caddies, ten frames etc. This 3D printer can do it all! I am so thankful that a very special donor to me helped my classroom fund this project. What would you do with a 3D printer in your classroom?


Books are always a POPULAR request and donors love searching by book titles. I was able to add about 15 new Big Books to my classroom thanks to this project. If you teach elementary, you know how much our students LOVE to use big books and how beneficial they are to us the teacher!


I had a year of Scholastic Let's Find out magazines funded for my classroom. This then allowed me the opportunity to become an adviser for Scholastic. I have not had to pay for a subscription since 2013. Wowzers, talk about a gift that just has kept giving! We know how important reading informational text is for our students but finding informational text on their level is another story. If you do not receive Scholastic Magazines in your classroom, I highly suggest looking into it!


Sets of different math games, perfect for math stations! Side note, this project funded in 2013 and this math game is still one of my students' favorite games!


The popular Hokki Stools! I funded 8 green ones with this project. My students LOVE these!! They can just move them to different places in the room if they would prefer that stool over the chair. Another great project, that many, many classes have been able to use.


Stop, buying so much for your classroom and write a project for the basic items that we are constantly running to Target to get! 


We received all the materials that we needed to create a classroom garden! The garden bed, soil, shovels, seeds, watering cans etc. One of my most favorite projects!


I have been able to fund 3 sets of Dash & Dot, Beebots and Ozobots. Robots are so much fun in kindergarten!


I was able to help my school's Running Cub get water bottles, shoelaces, timers and other great items they needed!


These examples are just a small representation of items that I have had funded and that you could too! You are welcome to browse my DonorsChoose page for more inspiration!

Stay tuned for future posts!

Sunday, February 4, 2018

Writing a DonorsChoose Project


Welcome to Post #2 in my All Things DonorsChoose Series! To start from the beginning Click Here! If you are familiar with writing DonorsChoose projects but need advice with utilizing match offers, special request projects, PD projects or finding donors, stay tuned!

If you have not yet created an account Click here to create your account and 1st project!


Now that you have created a teacher account on DonorsChoose.org, you are ready to write your first project. So exciting!! The first thing that you need to do is login to your account and you should see the screen below. Then click on "Create Project"


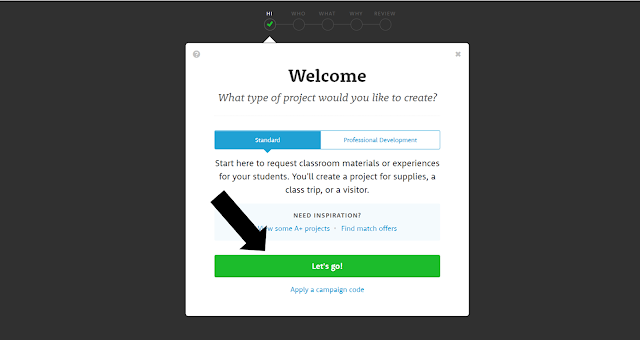
Then you will be taken to this screen. You will see a couple of different options on this screen to continue. If you are writing a project for a match or innovation challenge, you will need to enter the campaign code. (This is something that we will cover in another post). For your first project, or just to get comfortable with the process, keep it clicked on "standard" and then click the green button "Let's Go!" (You can always come back to this screen, if you decide to add a code later. Draft projects that haven't been edited for 30 days will then be archived. So you have time to work on a project and come back if you choose!) 


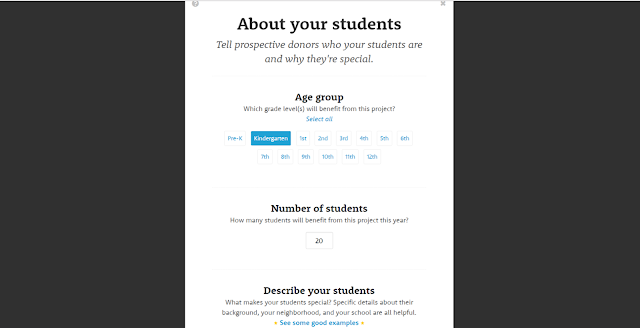
Now you are ready to fill out the information on your students. You will select all the grade levels that you teach, how many students that your project will serve and then a short 2 paragraphs about your students. Note: the 1st sentence in your 2nd paragraph, will highlight green. That means it will pull it out as a quote once your project has posted and donors will be very likely to read that quote. So you want to be sure to think about the most important thing that you want to share with donors about your students/classroom. 

Then you will need to upload a class picture. Be picky on the photo that you choose. Your classroom picture will start to become a "mascot" for your classroom and donors will recognize your picture. Make sure it reflects your classroom, students and teaching beliefs. They will not accept your photo if you use clip art, empty classroom or blurry. Note: Everything that you enter on this page will auto save for future projects. You can change this information if you choose for another project but it is nice that they keep this all filled in for you!


Now you are ready to shop!! You just select the vendor of your choice, click continue, fill up your cart and click check out. You can create a project using multiple vendors. Some popular elementary vendors: Lakeshore Learning, Kaplan, Best Buy and Amazon! 


Once you click check out, the cart will automatically be transferred to your DonorsChoose page.  You can edit the quantities on this page (Except items from Amazon) or remove items. Sometimes I shop a variety of vendors and load up my cart and look at the cost. Price varies from vendor so always price check. I have seen some items with as much as $100 price difference!! If you start loading your cart and realize the cost is getting to high, think about splitting the project into multiple parts to keep the cost down.


Once you have everything you need, now it is time to summarize your cart. This is one sentence that you need to be sure to list at least the 3 most expensive items by name. You will go in more detail on why you need the items in the project description. Once you have summarized your cart, click to continue.


Now it is time to create a fun title for your project! Try to make it catchy, tie it with a song title, rhyme etc. Most important thing is that it does portray the theme of your project so donors have an idea what it may be about.


Now it is time for the most IMPORTANT piece of your project. Why do you need these materials? How will it impact your students? What will the project look like? Be very specific in this part. Use the name of the resources in your project essay. Try not to tell your donors but show your donors through your words. Remember, most donors are not experts in education. Just like you may not understand all of the medical terms when a doctor is talking to you a potential donor may not understand words that we use in our every day language at school. 

This essay should feel more conversational. Pretend that you are sitting a coffee shop with a potential donor that knows nothing about you or your explain. How can you explain your idea? Why is it important? What will the impact be in your classroom?


After choosing up to 2 subject areas, you will then click save and continue. The LAST page is where you will see exactly what the donor will see on your project. Take time to review each section. Triple dog check for typos. Let your teacher bestie read your essay.

Did you share your passion using words? Is it clear to potential donors what you need and how you will use it? If so, click submit your project! It will be reviewed and will post within 5 days! WAHOO!

Stay tuned for the next post in my DonorsChoose series! If you are looking for specific advice or have an idea for a topic, comment below!

Part 3- Ideas for your DonorsChoose project

Saturday, February 3, 2018

Creating your DonorsChoose Account


Welcome to the first post in my (new) series all about DonorsChoose. Perhaps, you are here through a google search, you follow me, an old DonorsChoose blog post sent you or something else entirely but either way, I am so glad that you are here! If you follow me, you have heard the news that I am a National Teacher Ambassador for DonorsChoose. So pretty much, I LOVE DonorsChoose and want to help others discover the magic too!


Today I am sharing how to get started on DonorsChoose.org. I will walk you through creating your account! Click here to Sign up here!
  

First, you need to create an account on DonorsChoose.org as a teacher. Any teacher that works at a public school who directly works with children is eligible to create an account. 
Give yourself about 15 minutes and you can be registered to begin using DonorsChoose.org and saving money!!


You will need to confirm that you meet all the requirements to use DonorsChoose.org.


Read and agree to the user agreement.

Start searching for your school


 Select the grade level(s) that you teach and type in a few details about your position. 


Now it is time to add your information. Hint: type in your birthday because there will be a birthday banner displayed on your project to celebrate your special day! What a great reason for donors to choose to support your project!!


Review all of your details. Make sure everything is accurate!


Then HOORAY, you are ready to begin planning your first project!!


If you need help with  creating your account or checking your eligibility, check out this help article from DonorsChoose.org 


If you would to have someone to help talk you through the process, contact me! If I help you create your first project, I have a special treat to give to you! Let me help you jump start your project! :)