Welcome to Post #2 in my All Things DonorsChoose Series! To start from the beginning Click Here! If you are familiar with writing DonorsChoose projects but need advice with utilizing match offers, special request projects, PD projects or finding donors, stay tuned!
If you have not yet created an account Click here to create your account and 1st project!
If you have not yet created an account Click here to create your account and 1st project!
Now that you have created a teacher account on DonorsChoose.org, you are ready to write your first project. So exciting!! The first thing that you need to do is login to your account and you should see the screen below. Then click on "Create Project"
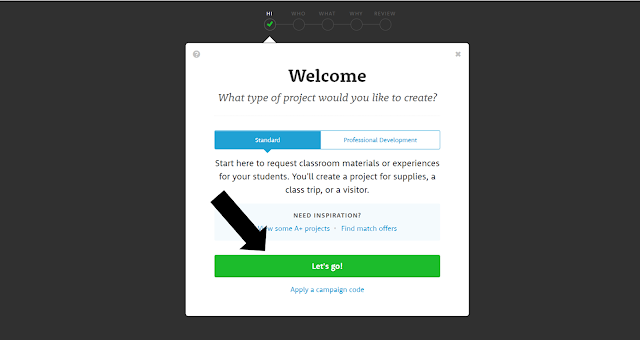
Then you will be taken to this screen. You will see a couple of different options on this screen to continue. If you are writing a project for a match or innovation challenge, you will need to enter the campaign code. (This is something that we will cover in another post). For your first project, or just to get comfortable with the process, keep it clicked on "standard" and then click the green button "Let's Go!" (You can always come back to this screen, if you decide to add a code later. Draft projects that haven't been edited for 30 days will then be archived. So you have time to work on a project and come back if you choose!)
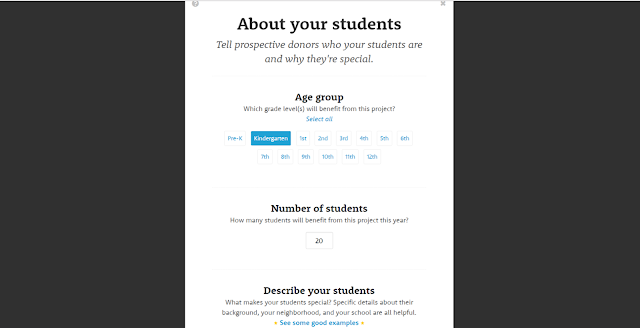
Now you are ready to fill out the information on your students. You will select all the grade levels that you teach, how many students that your project will serve and then a short 2 paragraphs about your students. Note: the 1st sentence in your 2nd paragraph, will highlight green. That means it will pull it out as a quote once your project has posted and donors will be very likely to read that quote. So you want to be sure to think about the most important thing that you want to share with donors about your students/classroom.
Then you will need to upload a class picture. Be picky on the photo that you choose. Your classroom picture will start to become a "mascot" for your classroom and donors will recognize your picture. Make sure it reflects your classroom, students and teaching beliefs. They will not accept your photo if you use clip art, empty classroom or blurry. Note: Everything that you enter on this page will auto save for future projects. You can change this information if you choose for another project but it is nice that they keep this all filled in for you!
Now you are ready to shop!! You just select the vendor of your choice, click continue, fill up your cart and click check out. You can create a project using multiple vendors. Some popular elementary vendors: Lakeshore Learning, Kaplan, Best Buy and Amazon!
Once you click check out, the cart will automatically be transferred to your DonorsChoose page. You can edit the quantities on this page (Except items from Amazon) or remove items. Sometimes I shop a variety of vendors and load up my cart and look at the cost. Price varies from vendor so always price check. I have seen some items with as much as $100 price difference!! If you start loading your cart and realize the cost is getting to high, think about splitting the project into multiple parts to keep the cost down.
Once you have everything you need, now it is time to summarize your cart. This is one sentence that you need to be sure to list at least the 3 most expensive items by name. You will go in more detail on why you need the items in the project description. Once you have summarized your cart, click to continue.
Now it is time to create a fun title for your project! Try to make it catchy, tie it with a song title, rhyme etc. Most important thing is that it does portray the theme of your project so donors have an idea what it may be about.
Now it is time for the most IMPORTANT piece of your project. Why do you need these materials? How will it impact your students? What will the project look like? Be very specific in this part. Use the name of the resources in your project essay. Try not to tell your donors but show your donors through your words. Remember, most donors are not experts in education. Just like you may not understand all of the medical terms when a doctor is talking to you a potential donor may not understand words that we use in our every day language at school.
This essay should feel more conversational. Pretend that you are sitting a coffee shop with a potential donor that knows nothing about you or your explain. How can you explain your idea? Why is it important? What will the impact be in your classroom?
After choosing up to 2 subject areas, you will then click save and continue. The LAST page is where you will see exactly what the donor will see on your project. Take time to review each section. Triple dog check for typos. Let your teacher bestie read your essay.
Did you share your passion using words? Is it clear to potential donors what you need and how you will use it? If so, click submit your project! It will be reviewed and will post within 5 days! WAHOO!
Stay tuned for the next post in my DonorsChoose series! If you are looking for specific advice or have an idea for a topic, comment below!
Part 3- Ideas for your DonorsChoose project
Part 3- Ideas for your DonorsChoose project


No comments:
Post a Comment
I love connecting with other bloggers and teachers. Leave a comment below!!